简单的IP查询页面制作
hhs
撰写于 2024年 03月 16 日

简单的IP查询页面制作

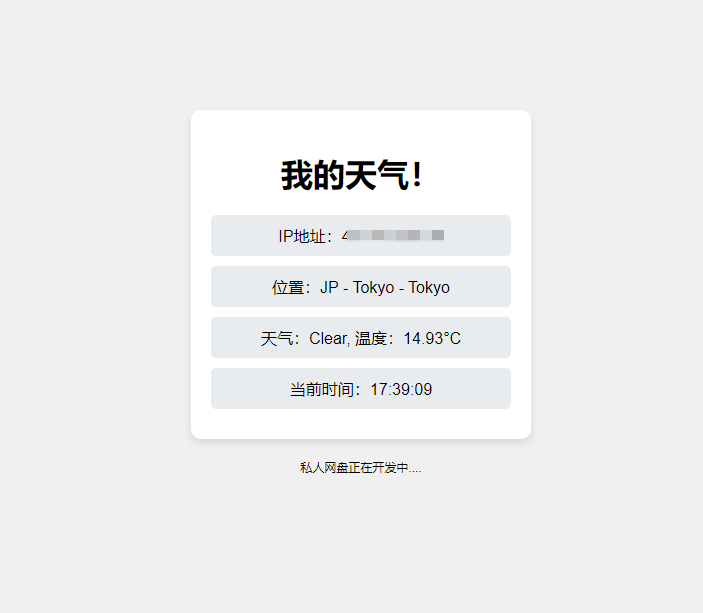
如图

image-20240316173951473

会根据受访者的IP定位查询天气

但时间来说 就是自己电脑的时间

本来想做时区的,但发现没那个必要 好歹有个东西能辨别一下真伪

需要用的2个api key

一个是

https://ipinfo.io/

↑ 查询IP地址的

每个月5万次查询,超过就罢工 免费的

花钱的

image-20240316174311934

所以还是省点吧

o(╥﹏╥)o

另一个是天气的api

home.openweathermap.org/

image-20240316174533251

直接注册就行

当2个api弄好之后 开始部署

服务器 用的是 ubantu

用到的 前端 后端js 最后的nginx配置

首先前端好弄

拿来直接就可以用

<!DOCTYPE html>
<html lang="zh-CN">
<head>
    <meta charset="UTF-8">
    <meta name="viewport" content="width=device-width, initial-scale=1.0">
    <title>看看天气咋样</title>
    <style>
        body {
            font-family: 'Arial', sans-serif;
            background-color: #f0f0f0;
            display: flex;
            justify-content: center;
            align-items: center;
            height: 100vh;
            margin: 0;
            flex-direction: column;
        }

        .container {
            background-color: white;
            padding: 20px;
            border-radius: 10px;
            box-shadow: 0 4px 8px rgba(0, 0, 0, 0.1);
            width: 300px;
            text-align: center;
            margin-bottom: 20px; /* 与底部文字保持距离 */
        }

        .info-box {
            background-color: #E9ECEF;
            padding: 10px;
            margin: 10px 0;
            border-radius: 5px;
        }

        .footer {
            color: black; /* 设置底部文字颜色 */
            font-size: 12px; /* 设置底部文字大小 */
        }
    </style>
</head>
<body>
    <div class="container">
        <h1>我的天气!</h1>
        <div id="ip" class="info-box">IP地址:加载中...</div>
        <div id="location" class="info-box">位置:加载中...</div>
        <div id="weather" class="info-box">天气:加载中...</div>
        <div id="time" class="info-box">当前时间:加载中...</div>
    </div>
    <div class="footer">
        私人网盘正在开发中....
    </div>
    <script>
        // 获取IP和位置信息
        fetch('/get-ip-info')
            .then(response => response.json())
            .then(data => {
                document.getElementById('ip').textContent = `IP地址:${data.ip}`;
                document.getElementById('location').textContent = `位置:${data.country} - ${data.city} - ${data.region}`;
                
                // 使用获取到的位置信息请求天气数据
                return fetch(`/get-weather?city=${data.city}`);
            })
            .then(response => response.json())
            .then(data => {
                document.getElementById('weather').textContent = `天气:${data.weather[0].main}, 温度:${data.main.temp}°C`;
            })
            .catch(error => console.error('获取信息失败', error));

        // 显示当前时间
        document.getElementById('time').textContent = `当前时间:${new Date().toLocaleTimeString()}`;
    </script>
</body>
</html>

直接复制黏贴上去就行,方便的很。

当然,这前端大神也可以自己改一改

随后就到了后端!

其实最开始的时候,直接把key 打进前端。但,可一个F12 基本上就曝光了

比如这样

<!DOCTYPE html>
<html>
<head>
    <title>当前天气</title>
    <script>
        function fetchWeather() {
            const apiKey = 'YOUR_API_KEY_HERE'; // 替换为您的API密钥
            const city = 'Beijing'; // 您想查询的城市
            const url = `https://api.openweathermap.org/data/2.5/weather?q=${city}&appid=${apiKey}&units=metric`;

            fetch(url)
                .then(response => response.json())
                .then(data => {
                    document.getElementById('weather').innerText = `当前温度: ${data.main.temp}°C`;
                })
                .catch(error => console.error('Error:', error));
        }
    </script>
</head>
<body onload="fetchWeather();">
    <h1>当前天气</h1>
    <p id="weather">加载中...</p>
</body>
</html>

Or

<!DOCTYPE html>
<html lang="en">
<head>
    <meta charset="UTF-8">
    <meta name="viewport" content="width=device-width, initial-scale=1.0">
    <title>我的天气应用</title>
    <style>
        body {
            font-family: 'Arial', sans-serif;
            background-color: #f0f0f0;
            display: flex;
            justify-content: center;
            align-items: center;
            height: 100vh;
            margin: 0;
        }

        .container {
            background-color: white;
            padding: 20px;
            border-radius: 10px;
            box-shadow: 0 4px 8px rgba(0, 0, 0, 0.1);
            width: 300px;
            text-align: center;
        }

        h1 {
            color: #007BFF;
            margin-bottom: 20px;
        }

        .info-box {
            background-color: #E9ECEF;
            padding: 10px;
            margin: 10px 0;
            border-radius: 5px;
        }
    </style>
</head>
<body>
    <div class="container">
        <h1>我的天气应用</h1>
        <div id="ip" class="info-box">IP地址:加载中...</div>
        <div id="location" class="info-box">位置:加载中...</div>
        <div id="weather" class="info-box">天气:加载中...</div>
    </div>
    <script>
        // 此处需要您填写自己的API密钥
        const ipinfoToken = 'YOUR_IPINFO_TOKEN'; // 替换为您的IPinfo API令牌
        const openWeatherMapApiKey = 'YOUR_OPENWEATHERMAP_API_KEY'; // 替换为您的OpenWeatherMap API密钥

        fetch(`https://ipinfo.io/json?token=${ipinfoToken}`)
            .then(response => response.json())
            .then(data => {
                const ip = data.ip;
                const location = `${data.city}, ${data.region}, ${data.country}`;
                document.getElementById('ip').textContent = `IP地址:${ip}`;
                document.getElementById('location').textContent = `位置:${location}`;

                return fetch(`https://api.openweathermap.org/data/2.5/weather?q=${data.city}&appid=${openWeatherMapApiKey}&units=metric`);
            })
            .then(response => response.json())
            .then(data => {
                const weather = `${data.weather[0].main}, 温度:${data.main.temp}°C`;
                document.getElementById('weather').textContent = `天气:${weather}`;
            })
            .catch(error => console.error('Error:', error));
    </script>
</body>
</html>

最后还是升级了一下

大概是这个思路

const express = require('express');
const fetch = require('node-fetch');
const app = express();
const PORT = 3000;

const IPINFO_TOKEN = process.env.IPINFO_TOKEN; // 假设您已经将 API 密钥保存在环境变量中
const OPENWEATHERMAP_API_KEY = process.env.OPENWEATHERMAP_API_KEY;

app.get('/weather', async (req, res) => {
    // 获取客户端 IP 地址
    const clientIp = req.ip;

    // 使用 IP 地址获取地理位置
    const locationResponse = await fetch(`https://ipinfo.io/${clientIp}/json?token=${IPINFO_TOKEN}`);
    const locationData = await locationResponse.json();
    const city = locationData.city;

    // 使用地理位置获取天气信息
    const weatherResponse = await fetch(`https://api.openweathermap.org/data/2.5/weather?q=${city}&appid=${OPENWEATHERMAP_API_KEY}&units=metric`);
    const weatherData = await weatherResponse.json();

    // 将天气信息返回给前端
    res.json(weatherData);
});

app.listen(PORT, () => {
    console.log(`Server is running on http://localhost:${PORT}`);
});
安装Node.js
cd ~
curl -sL https://deb.nodesource.com/setup_14.x | sudo -E bash -
sudo apt-get install -y nodejs
cd /path/to/your/project
npm install
node app.js

安装的时候可能找不到npm

which npm
curl -o- https://raw.githubusercontent.com/nvm-sh/nvm/v0.39.1/install.sh | bash
nvm install node  # 安装最新版本的Node.js和npm

安装

npm install dotenv

这个是储存key的

在 /var/www/html/app中 新建一个 .env 文件

IPINFO_TOKEN=XXXXXXXXX
OPENWEATHERMAP_API_KEY=XXXXXXXX

将 XXX 替换成自己的key

然后dotenv加载.env文件

require('dotenv').config();

const ipinfoToken = process.env.IPINFO_TOKEN;
const openWeatherMapApiKey = process.env.OPENWEATHERMAP_API_KEY;

如果出现问题,应该是没有正确安装

重新安装

curl -o- https://raw.githubusercontent.com/nvm-sh/nvm/v0.39.1/install.sh | bash

初始化代码:

export NVM_DIR="$HOME/.nvm"
[ -s "$NVM_DIR/nvm.sh" ] && \. "$NVM_DIR/nvm.sh"  # This loads nvm
[ -s "$NVM_DIR/bash_completion" ] && \. "$NVM_DIR/bash_completion"  # This loads nvm bash_completion

都完事了,就在 /var/www/html/app 创建 index.js

同时也要创建 .env

这个 .env 的 文件夹中 就2行 一个IP的key 一个天气的key

IPINFO_TOKEN=XXXXXXXX
OPENWEATHERMAP_API_KEY=XXXXXX

完整的后端代码如下

require('dotenv').config(); // 加载环境变量

const express = require('express');
const fetch = require('node-fetch');
const morgan = require('morgan');
const fs = require('fs');
const path = require('path');

const app = express();
const PORT = process.env.PORT || 3000;

// 创建一个写入流,并将日志写入到指定文件中
const accessLogStream = fs.createWriteStream(path.join(__dirname, 'access.log'), { flags: 'a' });

// 设置morgan日志记录中间件,将日志输出到文件中
app.use(morgan('combined', { stream: accessLogStream }));

// 获取IP地址信息的路由
app.get('/get-ip-info', async (req, res) => {
    const ipinfoToken = process.env.IPINFO_TOKEN;
    // 获取请求者的IP地址
    const visitorIp = req.headers['x-forwarded-for']?.split(',').shift() || req.connection.remoteAddress;

    if (!visitorIp) {
        res.status(500).json({ error: '无法获取位置IP' });
        return;
    }

    try {
        // 调用IPinfo API获取访问者的IP地址信息
        const ipinfoResponse = await fetch(`https://ipinfo.io/${visitorIp}?token=${ipinfoToken}`);
        const ipinfoData = await ipinfoResponse.json();

        // 如果返回的数据不包含IP信息,则停止并返回错误
        if (!ipinfoData || !ipinfoData.ip) {
            res.status(500).json({ error: '无法获取位置IP' });
            return;
        }

        res.json(ipinfoData); // 将访问者的IP地址信息发送给前端
    } catch (error) {
        console.error('Error fetching IP info:', error);
        res.status(500).json({ error: 'Server Error' });
    }
});

// 获取天气信息的路由
app.get('/get-weather', async (req, res) => {
    const openWeatherMapApiKey = process.env.OPENWEATHERMAP_API_KEY;
    const city = req.query.city; // 从查询参数中获取城市名称

    if (!city) {
        res.status(400).json({ error: '城市名称是必需的' });
        return;
    }

    try {
        // 根据城市名称获取天气信息
        const weatherResponse = await fetch(`https://api.openweathermap.org/data/2.5/weather?q=${city}&appid=${openWeatherMapApiKey}&units=metric`);
        const weatherData = await weatherResponse.json();

        // 如果API返回了错误
        if (weatherData.cod != 200) {
            res.status(weatherData.cod).json({ error: weatherData.message });
            return;
        }

        res.json(weatherData); // 将天气信息发送给前端
    } catch (error) {
        console.error('Error fetching weather data:', error);
        res.status(500).json({ error: 'Server Error' });
    }
});

app.listen(PORT, () => {
    console.log(`Server running on port ${PORT}`);
});

发现漏洞

npm audit fix

没事可以弄一个日志 看看出啥问题了

morgan

最后一步 修改NGINX

因为之前已经做了其他事情,只能重新硬改一下

user www-data;
worker_processes auto;
pid /run/nginx.pid;
include /etc/nginx/modules-enabled/*.conf;

events {
    worker_connections 1024;
}

http {
    sendfile on;
    tcp_nopush on;
    tcp_nodelay on;
    keepalive_timeout 65;
    types_hash_max_size 2048;

    include /etc/nginx/mime.types;
    default_type application/octet-stream;
    gzip on;

    # HTTPS Server
    server {
        listen 443 ssl;
        
        server_name baidu.com;  # 替换成你的域名
        ssl_certificate       /etc/???/server.crt;  # 证书位置
        ssl_certificate_key   /etc/???/server.key; # 私钥位置
        
        ssl_session_timeout 1d;
        ssl_session_cache shared:MozSSL:10m;
        ssl_session_tickets off;
        ssl_protocols    TLSv1.2 TLSv1.3;
        ssl_prefer_server_ciphers off;

        location / {
            root   /var/www/html;
            index  index.html index.htm;
        }


        # Node.js应用的反向代理配置
        location /get-ip-info {
            proxy_pass http://localhost:3000;
            proxy_http_version 1.1;
            proxy_set_header Upgrade $http_upgrade;
            proxy_set_header Connection 'upgrade';
            proxy_set_header Host $host;
            proxy_cache_bypass $http_upgrade;
            proxy_set_header X-Forwarded-For $proxy_add_x_forwarded_for;
            proxy_set_header X-Real-IP $remote_addr;
        }

        location /get-weather {
            proxy_pass http://localhost:3000;
            proxy_http_version 1.1;
            proxy_set_header Upgrade $http_upgrade;
            proxy_set_header Connection 'upgrade';
            proxy_set_header Host $host;
            proxy_cache_bypass $http_upgrade;
            proxy_set_header X-Forwarded-For $proxy_add_x_forwarded_for;
            proxy_set_header X-Real-IP $remote_addr;
        }
    }

    # HTTP Server (用于SSL证书验证和HTTP到HTTPS的重定向)
    server {
        listen 80;
        location /.well-known/ {
            root /var/www/html;
        }
        location / {
            return 301 https://$host$request_uri;
        }
    }
}

完事了

版本不出意外的话 不会再继续更新

代码有点垃的感觉

没有做docker 也没做一键安装脚本

建议用pm2 做一下进程管理

有啥问题评论区吧。。

下课

简单的IP查询页面制作

简单的IP查询页面制作

如图

image-20240316173951473

会根据受访者的IP定位查询天气

但时间来说 就是自己电脑的时间

本来想做时区的,但发现没那个必要 好歹有个东西能辨别一下真伪

需要用的2个api key

一个是

https://ipinfo.io/

↑ 查询IP地址的

每个月5万次查询,超过就罢工 免费的

花钱的

image-20240316174311934

所以还是省点吧

o(╥﹏╥)o

另一个是天气的api

home.openweathermap.org/

image-20240316174533251

直接注册就行

当2个api弄好之后 开始部署

服务器 用的是 ubantu

用到的 前端 后端js 最后的nginx配置

首先前端好弄

拿来直接就可以用

<!DOCTYPE html>
<html lang="zh-CN">
<head>
    <meta charset="UTF-8">
    <meta name="viewport" content="width=device-width, initial-scale=1.0">
    <title>看看天气咋样</title>
    <style>
        body {
            font-family: 'Arial', sans-serif;
            background-color: #f0f0f0;
            display: flex;
            justify-content: center;
            align-items: center;
            height: 100vh;
            margin: 0;
            flex-direction: column;
        }

        .container {
            background-color: white;
            padding: 20px;
            border-radius: 10px;
            box-shadow: 0 4px 8px rgba(0, 0, 0, 0.1);
            width: 300px;
            text-align: center;
            margin-bottom: 20px; /* 与底部文字保持距离 */
        }

        .info-box {
            background-color: #E9ECEF;
            padding: 10px;
            margin: 10px 0;
            border-radius: 5px;
        }

        .footer {
            color: black; /* 设置底部文字颜色 */
            font-size: 12px; /* 设置底部文字大小 */
        }
    </style>
</head>
<body>
    <div class="container">
        <h1>我的天气!</h1>
        <div id="ip" class="info-box">IP地址:加载中...</div>
        <div id="location" class="info-box">位置:加载中...</div>
        <div id="weather" class="info-box">天气:加载中...</div>
        <div id="time" class="info-box">当前时间:加载中...</div>
    </div>
    <div class="footer">
        私人网盘正在开发中....
    </div>
    <script>
        // 获取IP和位置信息
        fetch('/get-ip-info')
            .then(response => response.json())
            .then(data => {
                document.getElementById('ip').textContent = `IP地址:${data.ip}`;
                document.getElementById('location').textContent = `位置:${data.country} - ${data.city} - ${data.region}`;
                
                // 使用获取到的位置信息请求天气数据
                return fetch(`/get-weather?city=${data.city}`);
            })
            .then(response => response.json())
            .then(data => {
                document.getElementById('weather').textContent = `天气:${data.weather[0].main}, 温度:${data.main.temp}°C`;
            })
            .catch(error => console.error('获取信息失败', error));

        // 显示当前时间
        document.getElementById('time').textContent = `当前时间:${new Date().toLocaleTimeString()}`;
    </script>
</body>
</html>

直接复制黏贴上去就行,方便的很。

当然,这前端大神也可以自己改一改

随后就到了后端!

其实最开始的时候,直接把key 打进前端。但,可一个F12 基本上就曝光了

比如这样

<!DOCTYPE html>
<html>
<head>
    <title>当前天气</title>
    <script>
        function fetchWeather() {
            const apiKey = 'YOUR_API_KEY_HERE'; // 替换为您的API密钥
            const city = 'Beijing'; // 您想查询的城市
            const url = `https://api.openweathermap.org/data/2.5/weather?q=${city}&appid=${apiKey}&units=metric`;

            fetch(url)
                .then(response => response.json())
                .then(data => {
                    document.getElementById('weather').innerText = `当前温度: ${data.main.temp}°C`;
                })
                .catch(error => console.error('Error:', error));
        }
    </script>
</head>
<body onload="fetchWeather();">
    <h1>当前天气</h1>
    <p id="weather">加载中...</p>
</body>
</html>

Or

<!DOCTYPE html>
<html lang="en">
<head>
    <meta charset="UTF-8">
    <meta name="viewport" content="width=device-width, initial-scale=1.0">
    <title>我的天气应用</title>
    <style>
        body {
            font-family: 'Arial', sans-serif;
            background-color: #f0f0f0;
            display: flex;
            justify-content: center;
            align-items: center;
            height: 100vh;
            margin: 0;
        }

        .container {
            background-color: white;
            padding: 20px;
            border-radius: 10px;
            box-shadow: 0 4px 8px rgba(0, 0, 0, 0.1);
            width: 300px;
            text-align: center;
        }

        h1 {
            color: #007BFF;
            margin-bottom: 20px;
        }

        .info-box {
            background-color: #E9ECEF;
            padding: 10px;
            margin: 10px 0;
            border-radius: 5px;
        }
    </style>
</head>
<body>
    <div class="container">
        <h1>我的天气应用</h1>
        <div id="ip" class="info-box">IP地址:加载中...</div>
        <div id="location" class="info-box">位置:加载中...</div>
        <div id="weather" class="info-box">天气:加载中...</div>
    </div>
    <script>
        // 此处需要您填写自己的API密钥
        const ipinfoToken = 'YOUR_IPINFO_TOKEN'; // 替换为您的IPinfo API令牌
        const openWeatherMapApiKey = 'YOUR_OPENWEATHERMAP_API_KEY'; // 替换为您的OpenWeatherMap API密钥

        fetch(`https://ipinfo.io/json?token=${ipinfoToken}`)
            .then(response => response.json())
            .then(data => {
                const ip = data.ip;
                const location = `${data.city}, ${data.region}, ${data.country}`;
                document.getElementById('ip').textContent = `IP地址:${ip}`;
                document.getElementById('location').textContent = `位置:${location}`;

                return fetch(`https://api.openweathermap.org/data/2.5/weather?q=${data.city}&appid=${openWeatherMapApiKey}&units=metric`);
            })
            .then(response => response.json())
            .then(data => {
                const weather = `${data.weather[0].main}, 温度:${data.main.temp}°C`;
                document.getElementById('weather').textContent = `天气:${weather}`;
            })
            .catch(error => console.error('Error:', error));
    </script>
</body>
</html>

最后还是升级了一下

大概是这个思路

const express = require('express');
const fetch = require('node-fetch');
const app = express();
const PORT = 3000;

const IPINFO_TOKEN = process.env.IPINFO_TOKEN; // 假设您已经将 API 密钥保存在环境变量中
const OPENWEATHERMAP_API_KEY = process.env.OPENWEATHERMAP_API_KEY;

app.get('/weather', async (req, res) => {
    // 获取客户端 IP 地址
    const clientIp = req.ip;

    // 使用 IP 地址获取地理位置
    const locationResponse = await fetch(`https://ipinfo.io/${clientIp}/json?token=${IPINFO_TOKEN}`);
    const locationData = await locationResponse.json();
    const city = locationData.city;

    // 使用地理位置获取天气信息
    const weatherResponse = await fetch(`https://api.openweathermap.org/data/2.5/weather?q=${city}&appid=${OPENWEATHERMAP_API_KEY}&units=metric`);
    const weatherData = await weatherResponse.json();

    // 将天气信息返回给前端
    res.json(weatherData);
});

app.listen(PORT, () => {
    console.log(`Server is running on http://localhost:${PORT}`);
});
安装Node.js
cd ~
curl -sL https://deb.nodesource.com/setup_14.x | sudo -E bash -
sudo apt-get install -y nodejs
cd /path/to/your/project
npm install
node app.js

安装的时候可能找不到npm

which npm
curl -o- https://raw.githubusercontent.com/nvm-sh/nvm/v0.39.1/install.sh | bash
nvm install node  # 安装最新版本的Node.js和npm

安装

npm install dotenv

这个是储存key的

在 /var/www/html/app中 新建一个 .env 文件

IPINFO_TOKEN=XXXXXXXXX
OPENWEATHERMAP_API_KEY=XXXXXXXX

将 XXX 替换成自己的key

然后dotenv加载.env文件

require('dotenv').config();

const ipinfoToken = process.env.IPINFO_TOKEN;
const openWeatherMapApiKey = process.env.OPENWEATHERMAP_API_KEY;

如果出现问题,应该是没有正确安装

重新安装

curl -o- https://raw.githubusercontent.com/nvm-sh/nvm/v0.39.1/install.sh | bash

初始化代码:

export NVM_DIR="$HOME/.nvm"
[ -s "$NVM_DIR/nvm.sh" ] && \. "$NVM_DIR/nvm.sh"  # This loads nvm
[ -s "$NVM_DIR/bash_completion" ] && \. "$NVM_DIR/bash_completion"  # This loads nvm bash_completion

都完事了,就在 /var/www/html/app 创建 index.js

同时也要创建 .env

这个 .env 的 文件夹中 就2行 一个IP的key 一个天气的key

IPINFO_TOKEN=XXXXXXXX
OPENWEATHERMAP_API_KEY=XXXXXX

完整的后端代码如下

require('dotenv').config(); // 加载环境变量

const express = require('express');
const fetch = require('node-fetch');
const morgan = require('morgan');
const fs = require('fs');
const path = require('path');

const app = express();
const PORT = process.env.PORT || 3000;

// 创建一个写入流,并将日志写入到指定文件中
const accessLogStream = fs.createWriteStream(path.join(__dirname, 'access.log'), { flags: 'a' });

// 设置morgan日志记录中间件,将日志输出到文件中
app.use(morgan('combined', { stream: accessLogStream }));

// 获取IP地址信息的路由
app.get('/get-ip-info', async (req, res) => {
    const ipinfoToken = process.env.IPINFO_TOKEN;
    // 获取请求者的IP地址
    const visitorIp = req.headers['x-forwarded-for']?.split(',').shift() || req.connection.remoteAddress;

    if (!visitorIp) {
        res.status(500).json({ error: '无法获取位置IP' });
        return;
    }

    try {
        // 调用IPinfo API获取访问者的IP地址信息
        const ipinfoResponse = await fetch(`https://ipinfo.io/${visitorIp}?token=${ipinfoToken}`);
        const ipinfoData = await ipinfoResponse.json();

        // 如果返回的数据不包含IP信息,则停止并返回错误
        if (!ipinfoData || !ipinfoData.ip) {
            res.status(500).json({ error: '无法获取位置IP' });
            return;
        }

        res.json(ipinfoData); // 将访问者的IP地址信息发送给前端
    } catch (error) {
        console.error('Error fetching IP info:', error);
        res.status(500).json({ error: 'Server Error' });
    }
});

// 获取天气信息的路由
app.get('/get-weather', async (req, res) => {
    const openWeatherMapApiKey = process.env.OPENWEATHERMAP_API_KEY;
    const city = req.query.city; // 从查询参数中获取城市名称

    if (!city) {
        res.status(400).json({ error: '城市名称是必需的' });
        return;
    }

    try {
        // 根据城市名称获取天气信息
        const weatherResponse = await fetch(`https://api.openweathermap.org/data/2.5/weather?q=${city}&appid=${openWeatherMapApiKey}&units=metric`);
        const weatherData = await weatherResponse.json();

        // 如果API返回了错误
        if (weatherData.cod != 200) {
            res.status(weatherData.cod).json({ error: weatherData.message });
            return;
        }

        res.json(weatherData); // 将天气信息发送给前端
    } catch (error) {
        console.error('Error fetching weather data:', error);
        res.status(500).json({ error: 'Server Error' });
    }
});

app.listen(PORT, () => {
    console.log(`Server running on port ${PORT}`);
});

发现漏洞

npm audit fix

没事可以弄一个日志 看看出啥问题了

morgan

最后一步 修改NGINX

因为之前已经做了其他事情,只能重新硬改一下

user www-data;
worker_processes auto;
pid /run/nginx.pid;
include /etc/nginx/modules-enabled/*.conf;

events {
    worker_connections 1024;
}

http {
    sendfile on;
    tcp_nopush on;
    tcp_nodelay on;
    keepalive_timeout 65;
    types_hash_max_size 2048;

    include /etc/nginx/mime.types;
    default_type application/octet-stream;
    gzip on;

    # HTTPS Server
    server {
        listen 443 ssl;
        
        server_name baidu.com;  # 替换成你的域名
        ssl_certificate       /etc/???/server.crt;  # 证书位置
        ssl_certificate_key   /etc/???/server.key; # 私钥位置
        
        ssl_session_timeout 1d;
        ssl_session_cache shared:MozSSL:10m;
        ssl_session_tickets off;
        ssl_protocols    TLSv1.2 TLSv1.3;
        ssl_prefer_server_ciphers off;

        location / {
            root   /var/www/html;
            index  index.html index.htm;
        }


        # Node.js应用的反向代理配置
        location /get-ip-info {
            proxy_pass http://localhost:3000;
            proxy_http_version 1.1;
            proxy_set_header Upgrade $http_upgrade;
            proxy_set_header Connection 'upgrade';
            proxy_set_header Host $host;
            proxy_cache_bypass $http_upgrade;
            proxy_set_header X-Forwarded-For $proxy_add_x_forwarded_for;
            proxy_set_header X-Real-IP $remote_addr;
        }

        location /get-weather {
            proxy_pass http://localhost:3000;
            proxy_http_version 1.1;
            proxy_set_header Upgrade $http_upgrade;
            proxy_set_header Connection 'upgrade';
            proxy_set_header Host $host;
            proxy_cache_bypass $http_upgrade;
            proxy_set_header X-Forwarded-For $proxy_add_x_forwarded_for;
            proxy_set_header X-Real-IP $remote_addr;
        }
    }

    # HTTP Server (用于SSL证书验证和HTTP到HTTPS的重定向)
    server {
        listen 80;
        location /.well-known/ {
            root /var/www/html;
        }
        location / {
            return 301 https://$host$request_uri;
        }
    }
}

完事了

版本不出意外的话 不会再继续更新

代码有点垃的感觉

没有做docker 也没做一键安装脚本

建议用pm2 做一下进程管理

有啥问题评论区吧。。

下课


赞 (3)

猜您想看

评论区(暂无评论)

这里空空如也,快来评论吧~

我要评论